Piano arduino 7 notes
De Wikidebrouillard.
Sommaire |
Présentation de l'expérience
A travers ce tuto , nous allons vous apprendre à réaliser un piano avec différents matériaux conducteur pour les touches!!! Pas de panique le code informatique vous est donné et commenté. Alors à vos plaques et câblez .
Bon courage à vous !!!!
Matériel
-
 La carte Arduino Uno
- Le logiciel Arduino
-
 20 fils électriques
-
 Une plaque labdec ou Breadboard
- Fichier:Résistance.jpg Sept résistances de 1 Méga-Ohm
- Un ordinateur pour programmer
- De la pâte à modelé
- De l'eau
- Sept bocaux en verre
- Un buzzer
- Du papier
- Un crayon à papier
- Du scotch
L'expérience
La manipulation
Le piano sous arduino permet la réalisation de 7 notes différentes (ou plus) à l'aide de différents matériaux et d'un buzzer. Pour mettre le code sur l'arduino , suivez les étapes décrites ci-dessous:
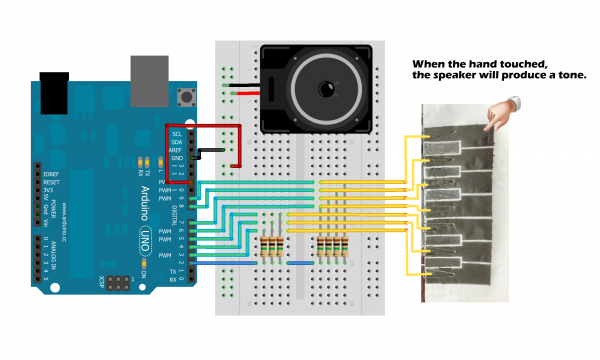
- Étape1: Faites le montage à partir du schéma fritzing ci-dessous
- Étape2: Téléchargez la bibliothèque Capasitive_sensor: [1] et ensuite déplacer le dans utilisateur>arduino>libraries.
- Étape3: Ensuite copier/coller le programme ci-dessous dans le logiciel arduino puis "Téléversez" le programme dans la carte
- Étape4: Faites des touchez au crayon à papier, en pâte à modeler ou même avec des verres d'eau et branchez/plongez les fils électrique dessus.
- Étape5: C'est à vous de jouez!
Ouvrez le logiciel Arduino Copiez-collez le code donné sous le schéma fritzing dans la fenêtre de l'aide arduino.
Schéma fritzing
Code
#include <CapacitiveSensor.h>
#define speaker 11

CapacitiveSensor   cs_2_3 = CapacitiveSensor(2,3);
CapacitiveSensor   cs_2_4 = CapacitiveSensor(2,4);
CapacitiveSensor   cs_2_5 = CapacitiveSensor(2,5);
CapacitiveSensor   cs_2_6 = CapacitiveSensor(2,6);
CapacitiveSensor   cs_2_7 = CapacitiveSensor(2,7);
CapacitiveSensor   cs_2_8 = CapacitiveSensor(2,8);
CapacitiveSensor   cs_2_9 = CapacitiveSensor(2,9);


void setup()
{
  cs_2_3.set_CS_AutocaL_Millis(0xFFFFFFFF);

  Serial.begin(9600);
}

void loop()
{
  long start = millis();

  long total1 =  cs_2_3.capacitiveSensor(60);
  long total2 =  cs_2_4.capacitiveSensor(60);
  long total3 =  cs_2_5.capacitiveSensor(60);
  long total4 =  cs_2_6.capacitiveSensor(60);
  long total5 =  cs_2_7.capacitiveSensor(60);
  long total6 =  cs_2_8.capacitiveSensor(60);
  long total7 =  cs_2_9.capacitiveSensor(60);


  Serial.print(millis() - start);
  Serial.print("\t");

  Serial.print(total1);
  Serial.print("\t");
  Serial.print(total2);
  Serial.print("\t");
  Serial.print(total3);
  Serial.print("\t");
  Serial.print(total4);
  Serial.print("\t");
  Serial.print(total5);
  Serial.print("\t");
  Serial.print(total6);
  Serial.print("\t");
  Serial.println(total7);


  if (total1 > 150) tone(speaker,523);
  if (total2 > 150) tone(speaker,587);
  if (total3 > 150) tone(speaker,659);
  if (total4 > 150) tone(speaker,698);
  if (total5 > 150) tone(speaker,784);
  if (total6 > 150) tone(speaker,880);
  if (total7 > 150) tone(speaker,988);


  if (total1<=150 & total2<=150 & total3<=150 & total4<=150 & total5<=150 & total6<=150 & total7<=150)
    noTone(speaker);

  delay(0);
}
Que voit-on ?
Quand on appuie sur une touche, une note est émise par le buzzer
Explications
De manière simple
Dans le code à copier dans la logiciel arduino, les notes (fréquences) sont inscrites, ainsi chaque touche possède sa propre note.
Allons plus loin dans l'explication
Développons les concepts scientifiques associés.
Ne pas hésiter à faire des liens avec Wikipédia.
Liens avec d'autres expériences
Expériences sur Wikidébrouillard
PATADUINO:[2]
DRAWDIO: [3]
Autres expériences
- Dernière modification de cette page le 27 mars 2015 à 16:07.
- Cette page a été consultée 32 087 fois.
- Contenu disponible sous Creative Commons - Paternite Partage a l'identique (CC-BY-SA).
- Politique de confidentialité
- À propos de Wikidebrouillard
- Avertissements


