Piano 8 bits
De Wikidebrouillard.
Sommaire |
Présentation du projet Arduino
Piano 8 touches , recréant 8 notes.
A travers ce tuto , nous allons vous apprendre à réaliser un piano !!! Pas de panique , la vidéo vous guidera pas à pas , de plus le code informatique vous est donné et commenté. Alors à vos plaques et câblez .
Bon courage à vous !!!!
Liste du matériel
-
 La carte Arduino Uno
-
 Le logiciel Arduino
-
 20 fils électrique (noir, rouge…)
-
 Une plaque labdec ou Breadboard
- Fichier:Résistance.jpg Huit résistances de 150 Ohm
-
 Un ordinateur pour programmer
 Huit Bouton poussoir
réalisation du projet
Explications
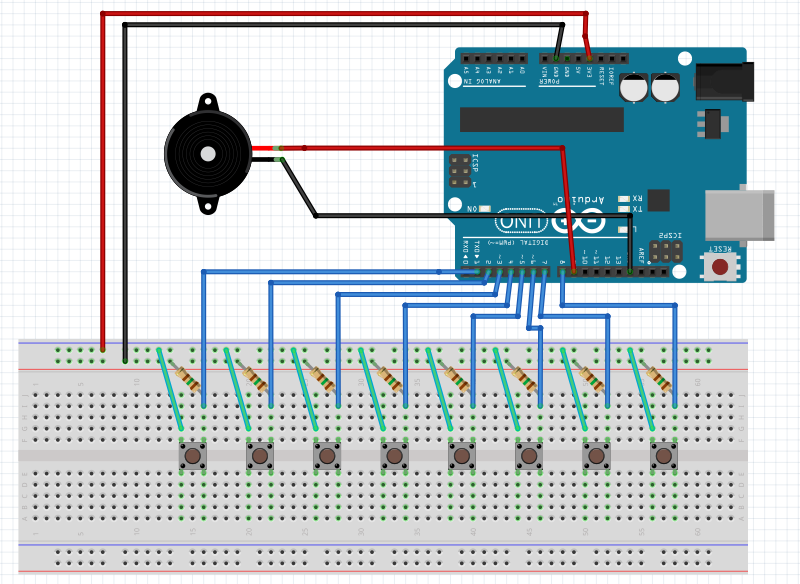
Le piano 8 bits sous arduino permet la réalisation de 8 notes différentes à l'aide de boutons poussoirs et d'un buzzer. Enjoy :)
Schéma Fritzing
Code
//Definitions des fréquences des notes
#define NOTE_C4 262
#define NOTE_CS4 277
#define NOTE_D4 294
#define NOTE_DS4 311
#define NOTE_E4 330
#define NOTE_F4 349
#define NOTE_FS4 370
#define NOTE_G4 392
#define NOTE_GS4 415
#define NOTE_A4 440
#define NOTE_AS4 466
#define NOTE_B4 494
#define NOTE_C5 523
#define NOTE_CS5 554
#define NOTE_D5 587
#define NOTE_DS5 622
#define NOTE_E5 659
#define NOTE_F5 698
#define NOTE_FS5 740
#define NOTE_G5 784
#define NOTE_GS5 831
#define NOTE_A5 880
#define NOTE_AS5 932
#define NOTE_B5 988
#define NOTE_C6 1047

#define NB_TOUCHES 8 //Régler ici le nombres de touches correspondant à votre clavier
#define POTARD 1

int notes3 = {NOTE_C3, NOTE_D3, NOTE_E3, NOTE_F3,NOTE_G3,NOTE_A3,NOTE_B3,NOTE_C4};
int notes4 = {NOTE_C4, NOTE_D4, NOTE_E4, NOTE_F4,NOTE_G4,NOTE_A4,NOTE_B4,NOTE_C5};
int notes5 = {NOTE_C5, NOTE_D5, NOTE_E5, NOTE_F5,NOTE_G5,NOTE_A5,NOTE_B5,NOTE_C6};
int notesOcarina = {NOTE_D4, NOTE_F4, NOTE_A4, NOTE_B4,NOTE_D5};

//Ce tableau définit l'octave sur laquelle le piano fonctionne. Vous pouvez la modifier
//en choississant d'autres notes dans le fihier pitches.h

void setup() {
  pinMode(0,INPUT);
  pinMode(1,INPUT);
  pinMode(2,INPUT);
  pinMode(3,INPUT);
  pinMode(4,INPUT);
  pinMode(5,INPUT);
  pinMode(6,INPUT);
  pinMode(7,INPUT);
  pinMode(9,OUTPUT);
}
void loop() {
  int fq = 0;// Cette variable sert à contenir la féequence correspondant à la note
  int* notes;
  int nb_notes = NB_TOUCHES;
  //Notez que l'ocarina de zelda n'as que 5 notes
  if (POTARD)
  {
    int potardValue = analogRead(A0);
    if (potardValue < 255/4)
    {
      notes = notes3;
    }
    else if (potardValue < 255/2)
    {
      notes = notes4;
    }
    else if (potardValue < 255*3/4)
    {
      notes = notes5;
    }
    else
    {
      notes = notesOcarina;
      nb_notes = 5;
    }
  }
  else
  {
    notes = notes4;
  }

  for (int thisSensor = 0; thisSensor < nb_notes ; thisSensor++)// Cette fonction
  {// permet à l'arduino de détecter si une touche du piano a été pressée
    int sensorReading = digitalRead(thisSensor);
    if (sensorReading == HIGH)
    {// Si une touche du piano est pressée la note est recopiée dans fq
      fq = notes[thisSensor];
    }

  }
  if (fq)
  {// Si il y a une note, on fait marcher le buzzer
    tone(9, fq);
  }
  else
  {// Si il n'y a pas de note, on empêche le buzzer de fonctionner
    noTone(9);
  }
}
Liens avec d'autres projets arduino
Un piano en utilisant de la pâte à modeler et un arduino PATADUINO
Pour aller plus loin
Si vous le souhaitez l'ajout d'un potentiomètre permet la modification des octaves
Liens avec le quotidien
Un lien vers une autre possibilité de créer un piano à l'aide d'un arduino: Transformer un clavier d'ordinateur en clavier de piano


